Need Help With Downsizing Your Home? A Practical Guide
Feeling overwhelmed? Get our expert guide for help with downsizing. Learn practical steps to declutter, sell items for profit, and manage the entire process.

Don't think of downsizing as a retreat. Think of it as a strategic move toward financial freedom. It’s your chance to turn a lifetime of accumulated belongings into cash, right-size your living space to fit your life now, and cut down on long-term expenses to secure your future.
Why Smart Downsizing Is a Financial Game Changer
Downsizing always gets framed as an emotional journey, and it certainly can be. But at its core, it's one of the most powerful financial decisions you can make. For many people, it's the single best way to unlock decades of home equity, get rid of a mortgage payment, and slash what you spend on utilities and maintenance every month.
This isn’t just for retirees, either. We’re seeing more and more younger families choose smaller homes to build up their savings and give themselves more flexibility in a shaky economy.
When you start viewing this transition as a financial opportunity, your whole approach changes. Instead of being overwhelmed by all the "stuff," you start seeing each item as a piece of a larger financial puzzle. This mindset helps you make logical, profit-driven decisions instead of getting stuck on emotional attachments.
The Modern Financial Motivation
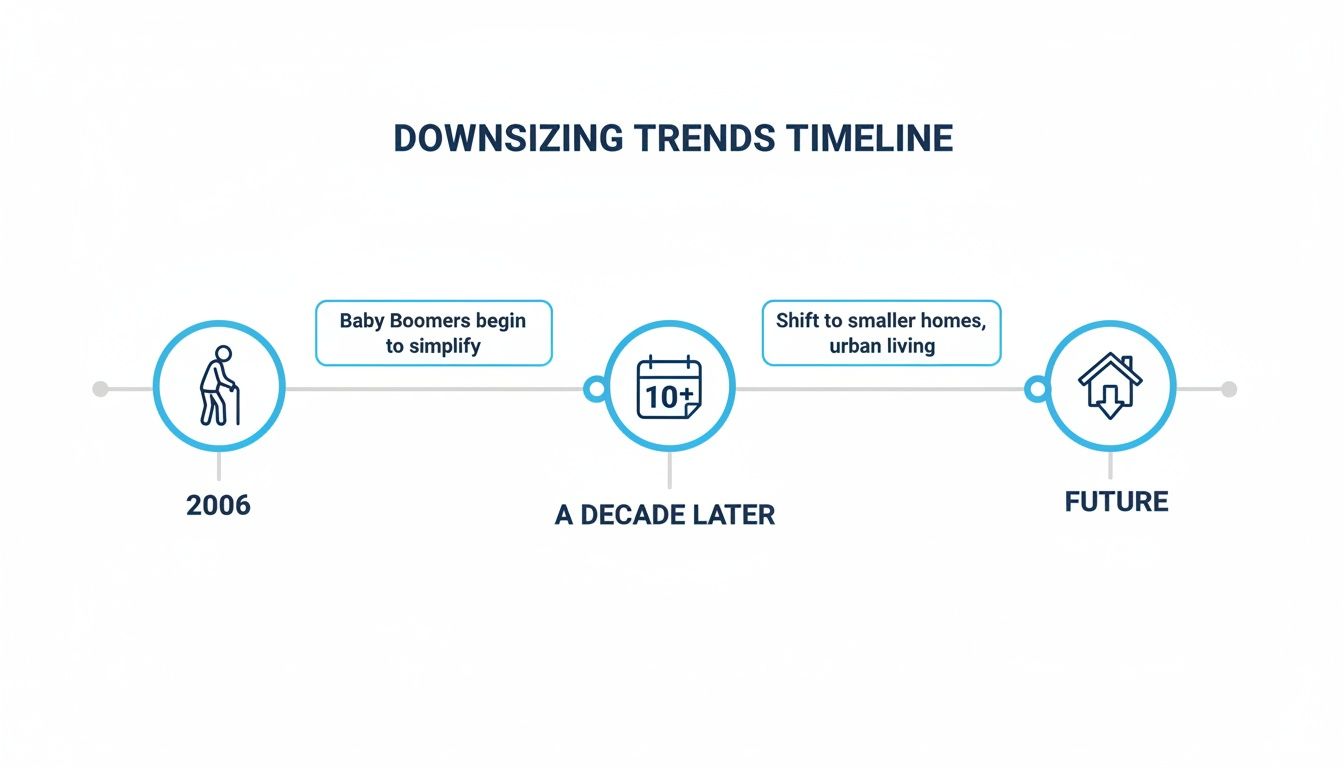
Let's be honest, the reasons for downsizing have become incredibly practical. Over the last decade, rising housing costs and an aging population have made it a necessity for many.
In the United States alone, about 28% of households headed by someone 65 or older are single-person homes. On top of that, surveys show that a whopping 60% of older homeowners are planning to move into a smaller home soon. This creates a huge, ongoing need for smart ways to liquidate household goods.
Your goal becomes crystal clear: turn those household assets into cash, efficiently. Every choice you make—from what to sell to how you sell it—directly impacts your bottom line. When you take control of the process, you make sure that the maximum value from your belongings ends up right where it belongs: in your pocket.
Reframe downsizing as an asset liquidation project. You'll shift from a mindset of loss to one of financial empowerment. The goal isn't just to clear out a house; it's to maximize your return.
Maximizing Your Returns
A well-run downsize can be a serious financial windfall. Beyond the profit from your home's sale, the value locked up in your personal property can help fund your retirement, pay off debt, or simply cover the cost of your move.
This is where you need to be careful. Traditional estate sale companies look convenient, but they often take 30-50% in commissions. That’s a massive chunk of your profit gone before you ever see it.
A do-it-yourself approach, powered by an online auction platform, lets you keep a much larger share of the proceeds. By managing the sale yourself, you get total control over pricing, timing, and how your items are presented—all keys to getting the best possible financial outcome.
To see just how much those commissions can cost you, check out our guide on the real cost of an estate sale. Taking charge of your own sale really can be a financial game changer.
Creating Your Personal Downsizing Action Plan
A successful downsize almost never happens by accident. It's the result of smart planning, not a last-minute, frantic weekend of sorting through a lifetime of memories. Without a clear roadmap, the whole process can feel like you're drowning in stuff, leading to burnout and decisions you'll later regret.
That's why building a personal action plan is the single most important thing you can do. It doesn't have to be some overly complicated spreadsheet, either. It’s simply about setting a realistic timeline, getting a handle on the true scope of the project, and breaking it all down into small, manageable chunks.
Establishing a Realistic Timeline
The best way to build a stress-free timeline is to start with your end date and work backward. Whether you have a hard moving day on the calendar or just a general goal, this gives you the structure you need to avoid that last-minute panic.
Think about a common scenario: a couple moving from their 3,000-square-foot family home into a 1,200-square-foot condo. They have six weeks to make it happen. An overwhelming task? Not if they break it down.
A smart plan might look something like this:
- Weeks 1-2: Start with the easy wins. Tackle the areas you rarely use, like the attic, basement, or that spare guest room. This builds momentum without messing up your daily life.
- Weeks 3-4: Move on to the semi-regular spaces. This means the home office, formal living room, and dining room.
- Week 5: Now it’s time for the high-traffic, personal areas. This is usually the toughest part—bedrooms, closets, and the kitchen—because these spaces are often the most emotionally charged.
- Week 6: The final push! This week is all about business: cataloging the items you're selling, arranging for donation pickups, and prepping for the actual move.
This staggered approach is a game-changer. It keeps you from burning out and turns a mountain of a project into a series of small, conquerable hills.
As you can see, downsizing isn't just a fleeting idea; it's a major trend that’s been gaining steam for years. Planning is what separates a chaotic move from a smooth transition.
Here’s a sample schedule to help you visualize what this could look like. Think of it as a template you can adjust to fit your own needs.
Your 6-Week Downsizing Action Plan
| Week | Primary Goal | Key Tasks | Pro Tip |
|---|---|---|---|
| 1 | Build Early Momentum | Sort attic, basement, and garage. Schedule bulk trash/donation pickups for Week 6. | Start with low-emotion areas to build confidence and see quick progress. |
| 2 | Tackle Secondary Spaces | Clear out guest rooms, formal living/dining areas, and home office. | Use sticky notes to label large furniture items as "Keep," "Sell," or "Donate" as you go. |
| 3 | Begin Sentimental Sorting | Go through bedrooms, closets, and personal storage (linens, keepsakes). | Don't get stuck! If an item stumps you, put it in a "Decide Later" box and revisit it in Week 5. |
| 4 | Conquer the Kitchen & Utility | Sort through the kitchen, pantry, and laundry room. These areas are dense with small items. | Group similar items together (e.g., all bakeware, all small appliances) before deciding what to keep. |
| 5 | Photograph & Catalog for Sale | Take photos and write descriptions for everything in your "Sell" pile. | Use good natural light and take photos from multiple angles. Be honest about any flaws. |
| 6 | Final Prep & Logistics | Host your DIYAuctions sale, pack remaining items, and manage final donation/disposal. | Set up a "staging area" for sold items to make your pickup day smooth and organized. |
This kind of week-by-week plan transforms the abstract goal of "downsizing" into a concrete, actionable to-do list.
Conducting a Room-by-Room Inventory
Before you can figure out what to do with everything, you have to know what you've got. Going room by room for an inventory is the only way to really grasp the scale of your project. This isn't just about making lists; it's about making decisions.
Grab a notepad or open a spreadsheet and walk through your home, one room at a time. The key is to force a decision for every single item by sorting it into one of four simple categories.
The Four-Box Method This is a classic for a reason—it works. As you touch each item, you must assign it to one of these four categories. No maybes!
- Keep: These are the non-negotiables. Things you use daily, absolutely love, or will fit perfectly in your new home.
- Sell: Items that still have good market value but you no longer need or have space for.
- Donate: Things that are in good, usable condition that could benefit a local charity.
- Discard: Anything that's broken, expired, stained, or simply not usable by anyone else.
This simple system cuts right through the indecision. Instead of a vague pile of "stuff to deal with later," you now have actionable groups. Your "Sell" pile is the foundation for your online auction, and your "Donate" and "Discard" piles can be scheduled for pickup. It’s about clarity and forward motion.
How to Sort and Price Your Belongings Realistically
Alright, this is where the rubber meets the road. Moving from the planning stage to actually sorting through everything can feel like a monumental task, but it’s really just a series of small decisions. The trick is to stay objective and not get bogged down in sentimental quicksand.
A great place to start is with the ‘one-year rule.’ It's simple: if you haven’t used an item in the last 12 months and it doesn't hold significant sentimental value, it’s a perfect candidate for your "sell" pile. This rule is fantastic for cutting through that "what if I need it someday?" paralysis that trips so many people up.

Making Objective Sorting Decisions
Let's be honest, the sentimental stuff is the hardest part. You have to be compassionate but firm with yourself. Instead of keeping boxes of your kids' artwork, take high-quality photos and create a digital album. That beautiful antique furniture you inherited but have no room for? Consider passing it along to another family member who will truly appreciate it. This way, the memory is preserved without cluttering your new life.
Having a system makes this so much easier. To get organized, our room-by-room declutter checklist breaks the entire project into manageable zones so you don't get overwhelmed.
Distinguishing Sentimental Value from Market Value
Once your piles are sorted, it's time to talk pricing. This is where a lot of people stumble, letting their emotional attachment set the price tag. That antique desk from your grandfather might feel priceless to you, but its actual market value is simply what a buyer is willing to pay for it today.
Do your homework. Jump on auction sites and online marketplaces to see what similar items have actually sold for. Look at the brand, condition, and age. This data-driven approach takes the guesswork out of pricing and ensures you set numbers that will attract real bidders.
Key Takeaway: Your memories are priceless, but your belongings have a specific market value. Separate the two to price effectively. An item is only worth what someone else is willing to pay for it today.
Sometimes, financial pressures can force the issue. Downsizing is often driven by job market changes, particularly for workers in their 50s and 60s. Financial experts often advise that after a layoff, housing expenses should be no more than 25–30% of your new income—a shift that almost always requires selling personal property to make the move possible.
Strategies for Smart Pricing and Lotting
Setting the right starting bid in an online auction is a bit of an art form. A surprisingly low starting bid—even just $1—can create a flurry of excitement and get more people to "watch" your item. This competition often drives the final price higher than a more cautious starting price ever would.
Here are a few strategies that work well:
- Low Starting Bids: Perfect for common household goods like kitchenware, books, or decor. It gets the ball rolling and builds bidding momentum.
- Informed Starting Prices: For items with a clear resale value, like well-known furniture or power tools, start the bidding around 25-30% of their market value.
- Reserve Prices: Got something truly valuable, like a piece of art or a collectible? Use a reserve price. It’s a hidden minimum that ensures your item won’t sell for a penny less than you’re comfortable with.
Grouping items into "lots" is another pro-level move. Instead of trying to sell a single decorative plate, create a "Dining & Entertaining" lot that includes plates, serving dishes, and glassware. It helps you sell lower-value items more effectively and creates a much more appealing package for buyers.
Finally, for certain specialty items, it pays to find the right sales channel. If you have unique heirlooms, you might find yourself exploring where to sell valuable items like luxury watches for maximum value and security. Being strategic about where you sell what can make a huge difference in your final earnings.
Managing a Successful Online Auction From Home
After all the sorting, pricing, and emotional heavy lifting, this is where your hard work really pays off. Using an online auction platform like DIYAuctions puts you in complete control, letting you run a professional-level sale right from your home—without handing over a huge chunk of your profits to an estate sale company.
You’ve already done the toughest part. Now it’s time to get your items in front of eager buyers and turn your clutter into cash. Believe me, this process is way more straightforward than it seems, and you definitely don't need to be a tech wizard to pull it off.
Building an Engaging Auction Catalog
Think of your online catalog as your digital showroom. The quality of your photos and the honesty in your descriptions will directly impact what people are willing to bid. Put yourself in the buyer's shoes—they can't pick up the items or inspect them in person, so your listing has to do all the talking.
Great photos are an absolute must. You don't need a high-end camera; your smartphone will do the job just fine. The real secret is good, natural light. Just find a spot near a window during the day and snap your pictures. Avoid using a harsh flash at all costs, as it creates weird shadows and washes out the true colors.
Here are a few simple photo tips I always share:
- Shoot From All Angles: Get the front, back, sides, and any unique details. For a piece of furniture, that might mean a close-up of the wood grain or the hardware.
- Be Honest About Flaws: See a little chip on a dinner plate or a scratch on a tabletop? Take a clear picture of it. This builds trust with your bidders and heads off any potential issues after the sale.
- Give a Sense of Scale: For smaller items, placing something familiar like a coin or a soda can next to them gives buyers an instant understanding of their actual size.
Your descriptions should be clear and to the point. Include dimensions, brand names, what it's made of, and a quick, honest note about its condition. You're not writing an essay—just give buyers the essential facts they need to bid with confidence.
Setting Your Auction Timeline and Bidding Structure
One of the best parts about running your own sale is that you set the schedule. From my experience, an auction that runs for 7 to 10 days hits the sweet spot. It’s long enough to get noticed by plenty of local buyers but short enough to create a sense of urgency that gets people bidding.
A shorter sale might not reach enough people, while a longer one can drag on and lose momentum. Even though platforms like DIYAuctions help market your sale to their network, that one-week window really gives people time to browse, ask questions, and decide what they want to bid on.
When it comes to the bidding itself, you've got a couple of powerful options:
- Starting Bids: For most everyday household items, starting the bid at $1 is a fantastic strategy. It removes any hesitation from buyers and often sparks a bidding war that drives the final price much higher than you'd expect.
- Reserve Prices: For more valuable pieces like original art, high-end collectibles, or designer furniture, a reserve price is your safety net. It's a hidden minimum price, ensuring your item won't sell for a penny less than you're comfortable with. It’s total peace of mind.
A successful auction isn't just about listing items; it's about creating a competitive environment. Low starting bids and a clear timeline are your best tools for generating bidder excitement and maximizing your final sales numbers.
A Real-World Success Story
Take one of our users who was on a tight deadline to downsize. They had to clear out a two-bedroom home with over 200 sellable items. Over a single weekend, they photographed and cataloged everything from kitchen gadgets to antique furniture.
They launched their sale to run for eight days. By the time it closed, they had over 50 registered bidders from their area, and 95% of their items had sold. Best of all, they kept 90% of the profits and managed everything with a single, organized pickup day. This isn't a one-off story; it's a blueprint for anyone who needs to downsize effectively. For a deeper dive, you can learn more about how to do an online auction with our complete guide.
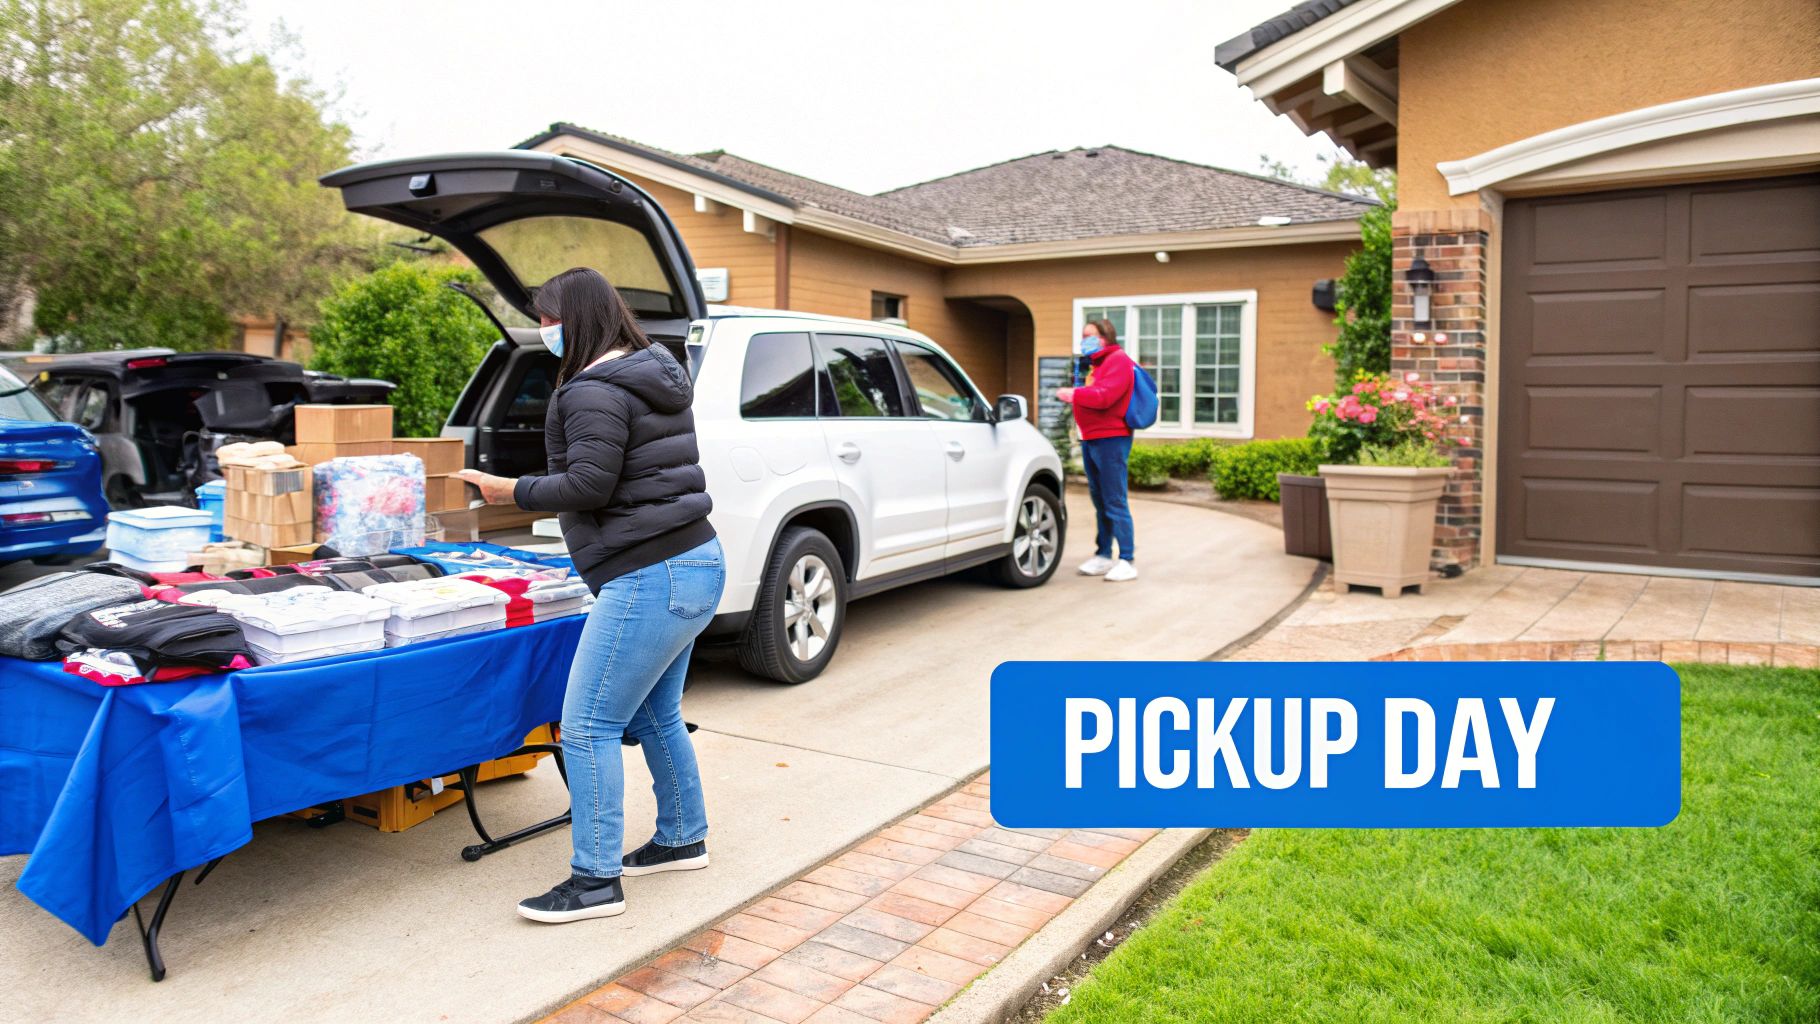
Coordinating a Smooth and Safe Pickup Day
The auction is over, the final bids are in, and you’ve been paid. Fantastic! But there's one last, crucial step: getting every item to its new owner. A well-run pickup day is the grand finale of your downsizing sale, turning what could be a frantic free-for-all into a calm, organized, and stress-free event.
The real secret to success here is all in the prep work. Think of it as the final act where clear communication and a smart system save you from any last-minute chaos. Your goal is a smooth handoff for everyone involved.
Setting the Stage for Success
Before anyone shows up, you need a central staging area. Your garage, a covered patio, or even a cleared-out living room will do just fine. Group all the sold items together by buyer, using their name or invoice number so you know exactly what goes with who. I recommend putting a label or sticky note on each individual item or lot—it completely eliminates confusion.
This one simple move is a game-changer. Instead of frantically searching for a specific vase while a buyer waits, you can walk right to their pile. It saves a ton of time and makes the whole experience feel professional and well-managed, leaving buyers with a great final impression.
If you're in the middle of a big move, using an ultimate moving house packing checklist can also be a huge help in keeping everything organized leading up to pickup day.
Managing a Safe and Efficient Flow
Remember, your home isn't a retail store, so managing the flow of people and cars is key. You don't want a traffic jam in your driveway or neighbors getting blocked in. The easiest way to prevent this is by scheduling pickups in timed intervals. Using a simple online calendar, you can offer 15-20 minute slots throughout the day.
At least 24-48 hours before pickup day, send a clear, concise message to every single buyer. Make sure it includes:
- Your full address and a map link: Don't make them guess. Make it super easy to find you.
- Their scheduled pickup time: A firm reminder of the time slot they signed up for.
- Parking instructions: Tell them where they can (and can't) park.
- Your contact number: Give them a way to text or call if they're running late.
Pro Tip: Gently remind buyers to bring their own muscle for heavy items. It's critical to state in your communications that you cannot help with lifting or loading furniture or other bulky things. This protects you from potential injury and liability.
Handling No-Shows
Life happens, and unfortunately, so do no-shows. It's frustrating, but it’s a manageable part of selling online. If a buyer misses their appointment without a word, your first move should be to reach out to them. If you still don't hear back after a reasonable amount of time, you can either offer the item to the next-highest bidder or simply relist it.
Dealing with What Remains
After the last car has pulled away, you might find yourself with a few unsold or unclaimed items. This is totally normal! Don't let these last few things become clutter that follows you to your new home. This is your final chance to clear the space.
- Consignment Shops: A great option for good-quality furniture, decor, or clothing that didn't sell.
- Specialty Dealers: Have some old stamps or antique tools? A specialty dealer might be interested.
- Targeted Donations: Instead of a generic drop-off, think about who could use your items. Offer tools to a local Habitat for Humanity ReStore or books to your library's "Friends" group.
By having a plan for the leftovers, you ensure your downsizing journey ends on a high note—with a clear space and the satisfaction of a job well done.
Your Top Questions About Downsizing, Answered
Starting a downsizing project always kicks up a lot of questions. Getting straight answers is the best way to feel confident and see the real upside of managing the process yourself. Let’s tackle some of the most common concerns we hear from people who need help with downsizing.
How Long Does This Whole Process Actually Take?
It’s different for everyone, but a well-thought-out downsizing sale usually takes between four and eight weeks from the first day of sorting to the final pickup day. One of the biggest mistakes you can make is trying to rush it—that’s a surefire way to get burned out and make decisions you’ll regret later.
Think of it in phases to make it feel less overwhelming. You’ll likely spend two to four weeks just sorting through everything. Then, budget about a week to photograph and catalog your items for the online auction. The auction itself will run for another seven to ten days, followed by a single, dedicated day for buyers to pick up their items.
The most common mistake people make when they downsize is underestimating the time and emotional effort involved, which leads to procrastination. Starting early with a clear plan and using a cost-effective platform like DIYAuctions avoids this major pitfall.
Is a Traditional Estate Sale Better for Valuable Items?
This is a huge misconception. It might seem logical to hand over antiques or collectibles to a traditional estate sale company, but they can take a massive commission—often between 30% and 50%. That’s a huge chunk of your profit gone before you see a dime.
With an online auction platform, you're in the driver's seat. You control the pricing and can keep up to 90% of the final sale price.
For those truly special pieces, you can set a reserve price. This is just a hidden minimum bid, so the item won't sell for less than you're comfortable with. It’s the perfect safety net, giving you broad exposure to buyers while protecting the value of your best items.
What If I Am Not Very Tech-Savvy?
Don't worry about it. Modern online auction platforms are built for everyone, no matter how comfortable you are with technology. If you can post something on Facebook Marketplace or attach a photo to an email, you’ve got all the skills you need.
The whole process is designed to be intuitive. You can upload photos right from your phone and follow simple prompts to write descriptions. Platforms like DIYAuctions are designed specifically for estate sales, so they handle the tricky parts like secure payment processing and marketing to local buyers, all wrapped up in a simple, easy-to-use package.
What Is the Best Way to Handle Sentimental Items?
This is almost always the hardest part. Going through items tied to powerful memories is tough, so it’s important to give yourself some grace while still sticking to your goals. The trick is learning to separate the memory from the physical object.
Here are a few practical strategies that really work:
- Create a Digital Memory Box: Scan old photos, letters, or your kids' artwork. You can create a beautiful digital album that keeps the memory alive without taking up any physical space.
- Keep One Representative Item: Instead of holding onto a whole set of your grandmother’s china, pick one or two beautiful pieces to display. It’s a wonderful way to honor the memory that actually fits your new, streamlined life.
- Share the Stories: As you sort, talk about the stories behind certain items with your family. This not only makes it easier to let go but also gives loved ones a chance to claim things that are meaningful to them.
This approach lets you cherish your past while moving forward, making sure your new home is filled only with things you truly love and use.
More guides in Downsizing & Relocation
June 17, 2026
Senior Relocation Assistance: Your Complete 2026 Guide
Find practical senior relocation assistance with our step-by-step guide. Learn to assess needs, find funding, and manage downsizing for a smooth transition.
Read guideFebruary 24, 2026
A Guide to Senior Moving Services for a Seamless Transition
Discover how senior moving services can simplify your relocation. This guide covers downsizing, planning, and hiring the right team for a stress-free move.
Read guideFebruary 19, 2026
A Practical Guide to Stress-Free Moves for Seniors
Planning moves for seniors can be overwhelming. Our guide offers practical advice on downsizing, selling items, and settling in for a smooth transition.
Read guideGet the estate sale pricing guide
Enter your email for pricing ranges, planning notes, and a clearer path to launch.